

It’s time to put your old paint chips to use! For those of you who just moved, painted a room in your house, or have paint chips hidden in a drawer somewhere taking up space let’s put them to use! We made a paint chip calendar, to-do list and some notes!
Supplies:
- About 10 – 15 paint chips (with 5 squares on each chip)
- Scissors
- Ruler
- Rubber Cement
- White poster board
- 16 x 20 inch frame
- Dry erase markers
- Small laminating machine
- 8 x 11 laminating sheets
- Thumbtacks
Note Squares:

1. Pick a few of your favorite paint chip colors.
2. Cut along the white line so that you have small squares. (There is no limit to how many you can cut!)
3. Feed the squares through the small laminator and cut off the excess laminating paper.
4. Using the dry erase markers, write small reminders on the notes! Pin to your cork-board or glue a magnet on the back and use these on the fridge too!
To-Do list:
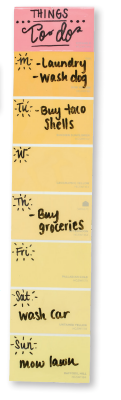
1. For this one, you will use the paint chips as is! Pick your two favorite paint chips so that 10 squares are showing.
2. Glue one chip on top of the other to your poster board, (2 squares from the top) so that you now have 8 chips total. Trim around the edges.
3. Place in laminating sheet and feed it through the laminator, and cut off the excess laminating paper.
4. Using the dry erase markers, use the first square to write things to-do, and follow with the days of the week on each square. Pin to your cork-board or glue a magnet on the back and use it on the fridge!
Calendar:
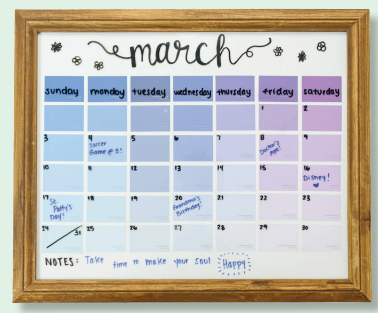
1. The paint chips will vary depending on where they are from. Gather the colors you want for your calendar and cut them into 42, 1.5 x 2.5 inch rectangles. 2. Cut your poster board to fit the 16 x 20 in. frame.
3. Lay them out on the poster board according to the color scheme you think fits your home best! We placed the darkest blues and purples first and used lighter colors as the rows went down. Use a ruler to space out your rectangles to your liking. We placed each rectangle .5 inches apart.
4. When you are happy with the way your calendar looks, begin gluing each rectangle to the poster board using a thin layer of rubber cement. Don’t worry about getting glue on the color side of the paint chip; it rubs off when it dries! Make sure to leave about an inch of white space at the bottom and about 2-3 inches of white space at the top of the poster board.
5. Once all of the rectangles are glued, place the poster board in the frame. Using the dry erase markers, write the days of the week across the first row, and then use the remaining rectangles to add the days of the month! Enjoy your Paint Chip Calendar!