

For years, I would gather leftover pine cuttings from Christmas tree sales and create huge, fresh wreaths for the front door. At the end of the season, I was always so sad to see them go. So, that is when I decided to find a fun, creative and pretty wreath project I could do and save for years to come! Creating felt wreaths is easy, inexpensive and fun for the whole family. Whether you are decorating your home as a winter wonderland or adorning it with all the Southern charm a girl could want, we have three perfect wreath designs for the holidays!
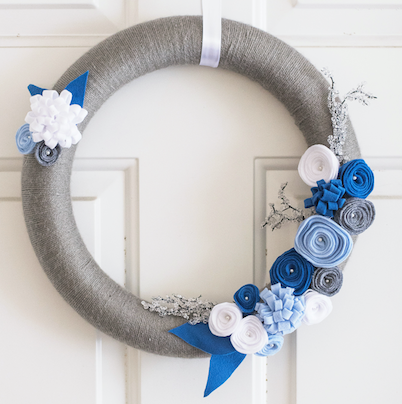
Winter Wonderland Wreath
Materials
- Foam wreath
- 2 white felt pieces
- 2 dark blue felt pieces
- Pushpins
- Hot glue gun and extra glue sticks
- 2 light blue felt pieces
- Ribbon
- Sharp craft scissors
- Gray yarn
- Holiday crystal foliage branches
- Pearl pushpins
- White ribbon
Step 1: Make Yarn Wreath
Wrap wreath completely in yarn. Once complete, tie yarn ends together at the back of the wreath.
To make a wreath the size of the one shown, it may take 30–45 minutes. (I usually watch “Harry Potter” as I go!)
TIP: I generally glue flowers over where the wrapping begins and ends.
Step 2: Create Flowers
Rosebuds*
Cut felt into CD-size circles, then cut those circles into spirals. For smaller buds, make circles smaller. For larger buds, make circles larger.
Hold one end of the spiral in one hand and twirl the felt around with your other hand, wrapping it into a rosebud shape. The tighter you wrap, the tighter the rosebud will be.
Carefully glue the ends and press together. Let dry.
Pop-up blossom*
Cut felt square into 2-inch wide, 10-inch long strips (can be longer and wider for bigger blossoms), then fold the strips longways.
Use sharp scissors to snip felt along the folded edge, creating loops about 1/8 to 1/4-inch thick. Be careful not to cut it all the way through the felt.
To create flower, pinch one end and, keeping the felt folded, begin rolling it into a ball. You will begin to see the bloom form.
Once finished rolling, glue the ends together. When dry, glue the bottom to ensure it stays together.
Step 3: Make Leaves
Draw a leaf shape on one side of the felt and cut it out. Be sure to it so that the side you did not draw on is visible.
Step 4: Design Wreath
Lay your yarn-covered wreath on a flat, heat-protected surface.
Begin laying out your rosebuds and crystal décor in a pattern you like. I cut some of the crystal branches with scissors to make smaller pieces that fit better
Attach décor with pushpins as best you can. I like to use pushpins to secure everything before gluing the pieces in place. This saves your fingers from any unnecessary burns.
Once you like your design layout, start hot-gluing the flowers and décor to wreath. For the rosebuds with pearls in the middle, I used pearl-tip push pins.
Once all your flowers and décor are securely glued, you can tie a matching ribbon to the top of the wreath to hang it.
TIP: To save your wreath for next year, store in a cool/dry place. Avoid attics.
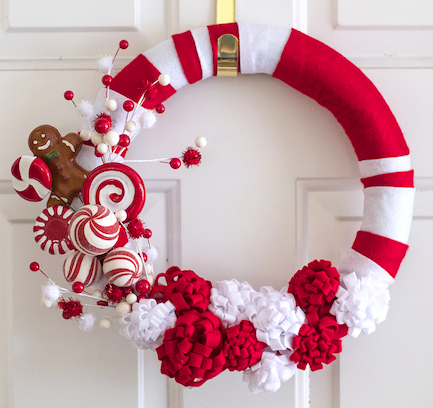
Peppermint Patty Wreath
Materials
- Foam wreath
- 4 red felt sheets
- 4 white felt sheets
- Pushpins
- Hot glue gun and extra glue sticks
- Gold ribbon
- Sharp craft scissors
- Holiday candy décor and foliage
Step 1: Create Wreath
Cut different sized strips of red and white felt.
Wrap felt strips around the wreath in alternating colors and sizes. Secure with pushpins prior to gluing.
Once you like the pattern, glue strips to wreath.
Step 2: Create Flowers
Use methods above! I just used the pop-up blossoms in this wreath, but you can use whatever you like.
Step 3: Design Wreath
When the flowers are finished, begin laying out your décor and flowers in a pattern you like. Use pushpins to place, then glue to secure.
Use gold ribbon to hang.
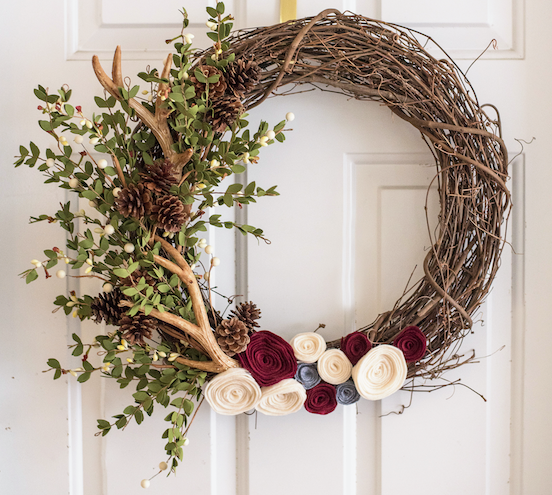
Southern Woods Wreath
Materials
- Hot glue gun and extra glue sticks
- Floral wire
- 3 cream felt pieces
- 3 burgundy felt pieces
- 2 gray felt pieces
- Wood vine wreath
- Ribbon
- Holiday greenery
- Pinecone picks (we found ours at the floral section of Hobby Lobby)
- Holiday faux antlers (we found ours at Hobby Lobby)
- Gold ribbon
Step 1: Create Flowers
Use the same method as the rosebuds, but instead of forming a tight bud, wrap the felt in a looser manner. This will allow for a more circle-like bud.
Step 2: Design Wreath
Lay wood wreath on flat surface.
TIP: Be careful where you do this as the wood vines and décor WILL scratch your nice dining room table — I know from experience!
Organize your greenery and antlers on the wreath by weaving the stems of the greenery in and out of the wreath.
Once the antlers are placed, anchor the ends of the antlers to the wreath with floral wire. Do this by weaving the wire in and out of the wreath and tying the base of the antler to the wreath. Pull tight and cut off excess. The flowers will hide the green wire.
Begin placing your flowers in a pattern you like. When you are satisfied with the design, begin gluing flowers to wreath. Keep in mind that glue will fall through the vines, so be sure not do this on a good surface.
Note: If you design your wreath like the one pictured, it will be heavier on one side. Keep this in mind when hanging it.
*For video tutorials on how to create the felt flowers, click here.
Photos by Sincerely Gone Photography
Related articles:
7 Outdoor Winter Activities In Gainesville
DIY Winter Decor From Old Sweaters!
Make DIY Fake Snow To Have A White Christmas In Florida
Simple And Fun “Elf On The Shelf” Ideas